So we’re going to be giving a general overview of LCD TV repair in this video and we’re going to take a look at the different components in LCD TVs and what can go wrong with these components and kind of the symptoms that they will show and also how to diagnose the problems and hopefully get them fixed.
I’d like to say that if you’re having a problem with your TV, be sure to check the model number first.
This is what appears in this little box over here.
Every TV is different. This is a Sony LCD TV, but you’ll see the model number and serial number over in a box like this the model number and serial number are very important because that is what will help you to identify what parts are needed to repair your TV if you’re having a problem with your TV.
Please feel free to comment in the comment section below this video or send us a message on YouTube with your TV model number and the problem that you’re having this way. We’ll be able to help you diagnose the problem and suggest a fix.
So the first thing you’re going to want to do is make sure that you have unplug your TV from any power source and that you have also grounded yourself properly.
Next you’ll want to take out the screws in the TV that are holding the back cover on it.
Every back cover of a TV is different but most are held in by screws and can be easily removed.
So we’ve removed all the screws here on the back of the TV now, we’re just going to remove this back panel will start by just identifying the different parts of the TV and then talk about them individually.
So first, we’ll look at the power supply which is right here in the middle of this TV.
The power supply takes in power and distributes it throughout the TV.
The power supply is typically connected to a power cord like this or to an AC adapter the main board, which is over here typically manages all of your inputs and outputs for your video and sound you’ll see here on the main board that we have RCA connections.
VGA connection and HDMI connections amongst others You’ll also see here that we have these wires that run to the speakers for the TV.
So again, this will control your audio and your video inputs and outputs over here. We have the backlight inverter. This part can often be covered by a metal or plastic cover.
You might have to take out some screws to get to this part. If you’re going to replace it.
The backlight inverter is what controls your ccfls or your light source for the TV the last part we’re going to look at is the t-con board the t-con board. Will sometimes be sitting right here out of TV, but for this one it is slipped into this little area right here the t-con board connects. This lvds cable right here to the main board. This cable is extremely fragile. So anytime you’re working with it. You’ll want to be very careful.
One thing to consider is that not every TV is going to be the exact same so not every TV will just have these four main parts and may have more and it may have less some of the parts might be connected where you might have. Backlight inverters and power supplies on the same board.
There are typically two different levels of repair for TV parts.
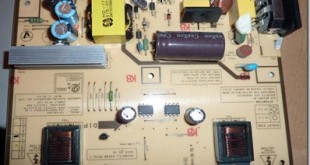
You can open up your TV find the board number and then look up that board number to find a replacement part or you can take your board and try and repair it at the component level at the component level. You would be testing different components on the board and making sure that they work the first board we are going to look at closer is Power supply now the power supply again takes in power and distributes it throughout the TV.
So the first thing that could go wrong here is that the TV set will not turn on if you are not able to power on your TV.
The first thing I would do is double check that the outlet Works try plugging something else into that outlet and be sure that it turns on you can plug in a clock you can plug in anything but just be sure that the outlet Works before you start taking apart your TV.
If the outlet works and you are not getting and you are still not getting power to your TV, then you will want to take a look at the power.
Supply power supplies will have a fuse on them.
You can check the fuse to see if it is blown and if it is you can try replacing that and plug the TV back in if the TV powers on in the fuse stays good you should be set to go if the fuse blows immediately right when you plug the TV back in then you’ll have another issue on the board that is blowing that fuse if you are. Going to try and check your fuse on your power supply.
Sometimes it can be a little bit more difficult.
Some fuses are ceramic and you would need a meter to test that fuse to see if it has been some common things to look for on. These boards are blown capacitors.
Well, you have a capacitor like this that has become raised at the top or is leaking fluid.
The next board we are going to look at is the main board again, this controls your inputs and outputs and true and controls your video and audio the first time that there could be something wrong with your main board is if your picture on your screen is not appearing you plug in a Blu-ray player to your HDMI connector, and it doesn’t work or you have your or you have your cable box connected anywhere to the main board and you are not getting a picture on the screen.
If this is the case, I always recommend that people double-check on a different TV and be sure that the cable box is working correctly or the Blu-ray player DVD player, whatever you have connected to the main board just to make sure that it is not the source. That is the problem. But yet it is actually your TV that is not showing the image.
Now it is possible to repair the main board at the component level, but it can be very difficult at times component level repairs take a lot more knowledge and expertise board repairs. Typically, you just have to remove the screws and carefully remove these connectors and you can put a new board right in there put the screws in and reconnect the connectors and you should be good to go.
Typically, what we recommend is ordering a new board as that will be a lot easier and faster for your repair again, you would want to look up the board number that you find on the damage main board. You can search that part number on our website and find compatible replacements for this board. You can also search your TV model number on our website and that will show you the different compatible boards for each part throughout the TV typically with the main board. You’ll see a lot more video issues than you do audio issues.
One of the most common issues is having a bad HDMI input but any of these components can go bad as well.
Up here again. We have the t-con board.
The t-con is what connects your main board to your LCD panel through the lvds cable again. This cable is very fragile.
So you’ll want to be very careful. If you’re disconnecting it at any point one common symptom of a bad t-con board is if your TV has backlights and sound but there is no picture.
So let’s say that you have your cable box connected to your TV you turn it on and you are able to hear the show that is playing but you are not able. To see the image.
That means that most likely there will be a problem with your t-con board because you are getting the sound from the main board, but you are not getting the image through the t-con.
Another common problem with the t-con board is that you can get colored vertical lines on your screen or half of the screen is missing the picture.
Now something that’s a little bit unique about this TV is that the t-con board is actually bonded into the panel.
So you would not be able to replace this t-con board, but now we’re going to take a look at a different TV where you would be able to replace the t-con where it is located out here on the panel similar to these other parts in this TV, you’ll just have to remove the screws that hold the t-con to the panel and then disconnect the connections very carefully, especially the lvds.
As it is very fragile.
Some tea cons also going to have ribbon connectors and you want to be very careful with removing those as well will show you a video right now on how to remove the ribbon connectors using your finger flip up the tab on the ribbon connector and gently remove the ribbon.
Please do not use a screw driver to open ribbon connectors as it can cause damage to the pins gently guide the ribbon back into the connector match the line printed on the ribbon cable with the edge. edge of the connector and close the tab on the top For the last board that we’re going to look at is the backlight inverter backlight inverter again takes the power from the power supply.
And turns on the lights that Supply the light for your TV the backlight inverter is typically connected to the panel and you’ll want to be extremely careful when you’re removing any of these pieces.
There are different types of connections from the backlight inverter to the panel and typically most are fragile some common problems with the backlight inverter.
So if you turn on your TV and you see the image show up on the screen for a second and then the screen goes black.
It could be your backlight inverter that is causing this problem.
If you have sound coming from your TV, but you don’t have an image. It could also be the backlight inverter that is causing this problem.
Thank you for watching our LCD video again. Just a reminder that if you have any issues with your TV, and you can’t quite figure out the problem, feel free to comment below this video in the comments section and try and be sure to include your TV model number possibly the serial number and any symptoms or problems that your TV is too. Displaying.
If you do not want to post a comment below the video, please feel free to send us a YouTube message the more information that you can provide to us about your TV issue the faster and more accurate. Our response can be Thank you for watching. One of our many tutorials here at shopjimmy.com.
If you have any further questions regarding your repair simply post a question in the comments section below or call our award-winning customer service team at the number on your screen.
We strive to learn and share new TV repair tips everyday subscribe to our YouTube channel and Grow With US share our videos with your friends and help us spread the savings and don’t forget to hit that like button.